Help Start | Home | Book Writer
Project
The Project section of the Project Commander provides a project diagram that you can use to manage your project and its files in the editor.
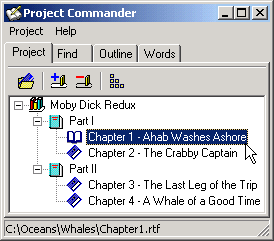 |
The Project section contains a diagram of a project created in the Project Manager
To open a project, choose Open Project from the Project submenu.
The blue books in the diagram signify titles that have files associated with them. The cyan books signify structural titles that have no files on disk.
|
Actions on the Commanders Project Menu
Open All Choose this to open all files in the current project.
Add File to Project Add one or more files to the project. A dialog appears for choosing a file to add. If the file in the current editor is not in the project, the File name edit box in the dialog will contain that files name, but you may choose a different file in the dialog or several files at once. To choose multiple files, hold down the Shift or Ctrl key while clicking on file names. NOTE: Another way to add files to the project is to drag and drop files from Windows Explorer onto the project tree.
Remove Selected File Remove the selected file from the project.
Sort Project Sort the project tree (diagram) according to choices you make in the Sort Project Dialog that pops up.
Additional Actions
Right click on the projects diagram to pop up a context menu for additional actions. See Commander | Project Context Menu.
For other actions with the project, see the Project menu.
See also: Disk Data / Editor Move.
Home | Book Writer